출저:https://tangoo91.tistory.com/5

문제1

mybatis와 JPA

MyBatis는 DB저장 프레임워크이다. SQL코드를 작성하고 결과를 객체와 매핑하는 것까지 직접 처리해야 한다. 테이블, DTO 등의 변경사항이 있을때 마다 매핑관련 내용에 대한 수정이 필요하므로 손이 많이간다.
JPA(Hibernate)는  ORM을 위한 프레임워크/인터페이스로써 JPA의 구현체가 Hibernate다.  SQL코드 없이 DB연동이 가능하며, 설정을 통해 대부분의 작업을 손쉽게 자동화할 수 있지만 기술적 난이도가 높다.


문제2

entity 연관관계 종류

문제3 

repository와 쿼리 메서드
문제4 thymeleaf 
th:each
th:if
th:unless
th:switch
th:href
등...
문제5 스프링 시큐리티 설정

'JAVA' 카테고리의 다른 글

List<Map>  (0) 2022.08.04
[Java] Map, HashMap, LinkedHashMap  (0) 2022.08.04
request.getParameter("")  (0) 2022.06.02
null과 ""를 구분해서 쓰자..  (0) 2022.05.18
로그인 알고리즘  (0) 2022.05.18
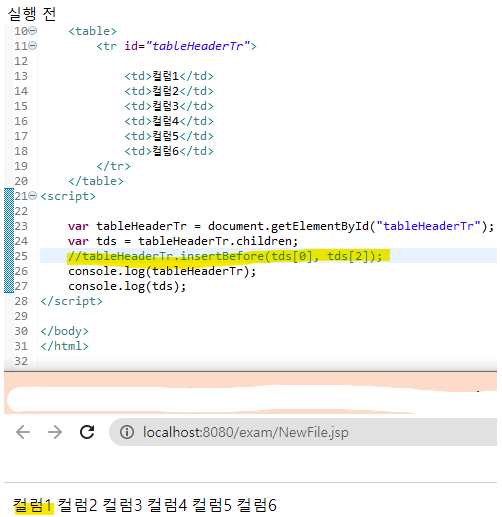
insertBefore() 함수 사용법


1. 부모노드 변수에 담기

2. 부모노드.insertbefore(삽입할 노드, 삽입할 노드의 다음 노드)


적용 전
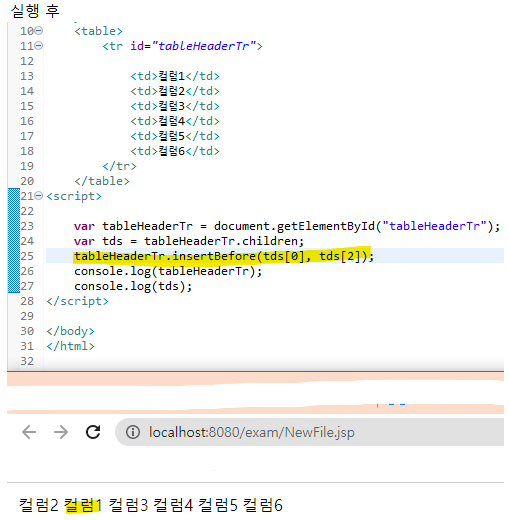
적용 후


tds[0]이 tds[2] 앞으로 이동한 것을 확인할 수 있다!!

★push 전에 꼭 petch 및 pull을 행하여 프로젝트를 최신으로 업데이트 해야함

★그렇지 않으면 다른 팀원들이 올린 소스코드와 충돌이 일어날 수 있음

★항상 코딩을 시작하기 전과 push 전에 각각 petch와 pull을 해주어 최신으로 업데이트하는 습관이 필요!!!


commit

git staging에서 Unstaged Changes에서 올리고싶은 걸 +단추를 이용하여 Staged Changes 에 올린 후 Commit Message에 메시지를 남긴 후 Commit and Push 클릭


merge

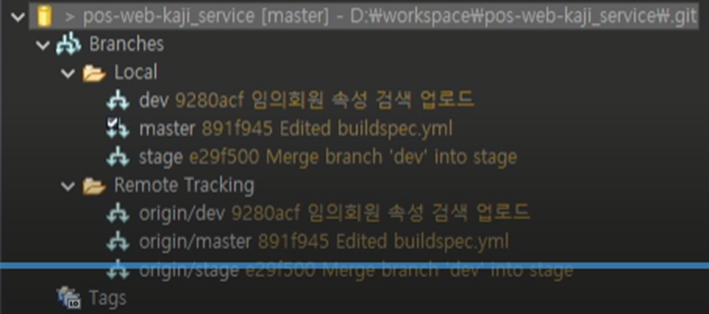
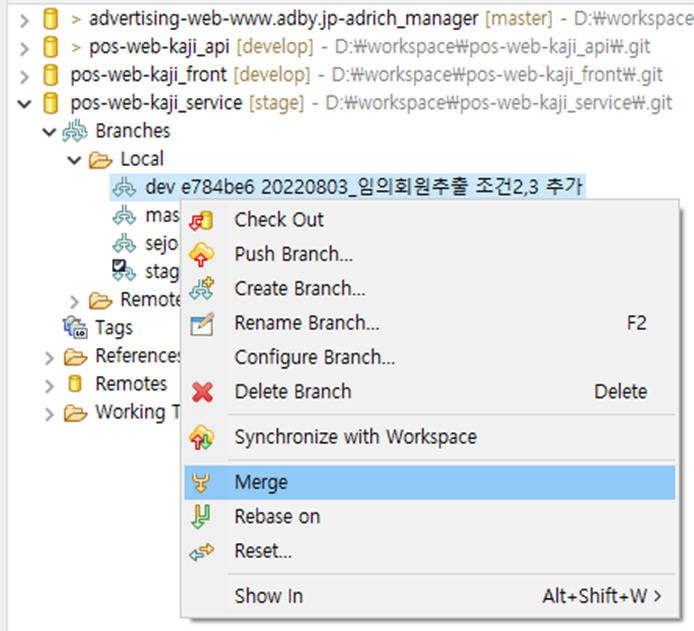
Git Repositories에서 Remote Tracking에 있는 프로젝트들을 Local에 모두 옮기고, Local check out하면 로컬 프로젝트가 dev/stage/prod 로 바뀐다. 예를들어 Master로 바뀐 상태에서  dev 우클릭 후 Merge를 클릭하면 내 로컬에 dev의 소스가 덮어짐.

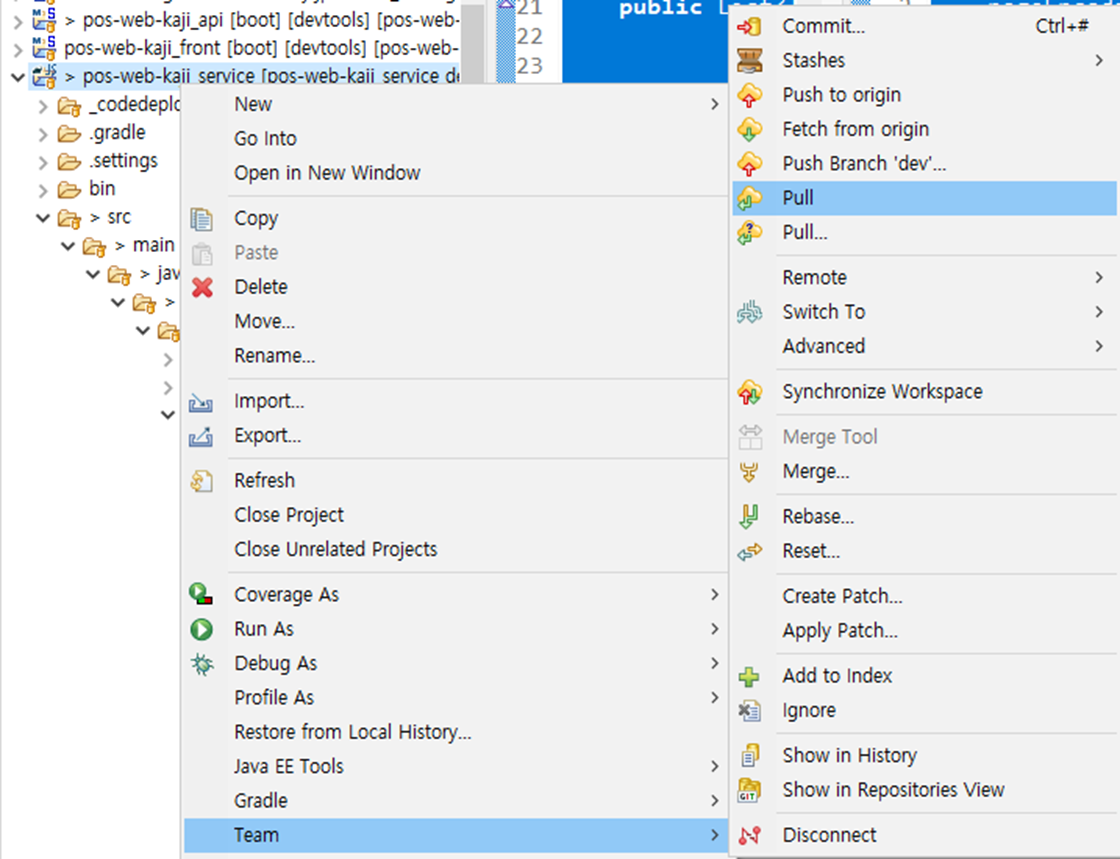
pull

톰캣 정지 시키고 pull~


다른 branch에 push하기

다른 branch로 checkout하고 pull로 소스 땡기고, 덮어씌우고싶은 걸 클릭한 뒤 merge 클릭 후 push to origin 클릭!


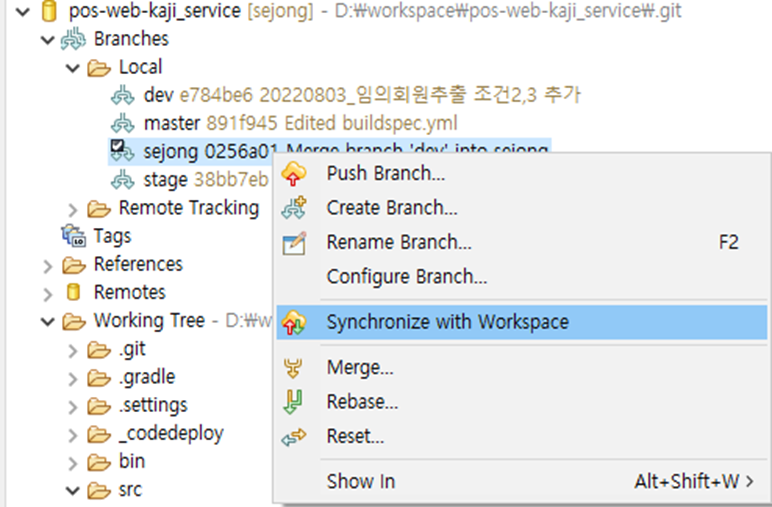
다른 branch에 소스코드 clone하기

Synchronize with Workspace 클릭 후 전체파일 체크하고 Overwrite.

만약 내가 수정한 파일이 존재한다면 소스코드의 충돌(Conflicts)이 발생하게 된다.

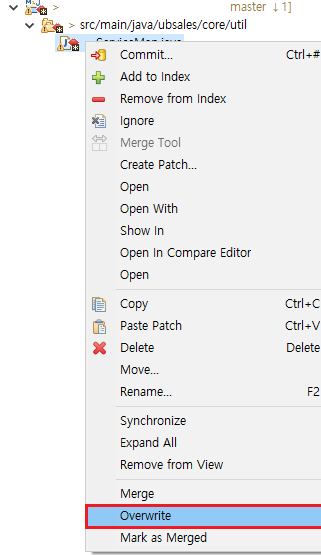
나의 코드를 무시하고 덮어쓰기 하고 싶은 경우,

충돌이 발생한 파일명 선택 > 마우스 우클릭 > Overwrite 클릭

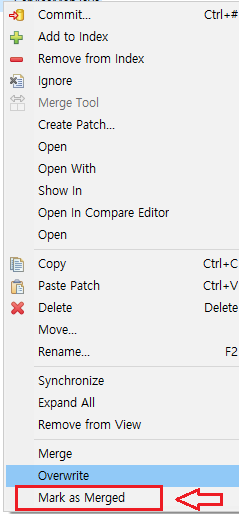
그다음 Mark as Merged 클릭

마지막으로 커밋!

그럼 다음 다시 pull하면 내려받을 수 있다.


1. List : 배열 형태로 [1, 2, 3 ...] 형태로 데이터 저장

2. Map : {key=value} 형태로 데이터 저장

3. 데이터 삽입 : List Map 에 데이터를 삽입하기 위해서는 Map 형태 데이터를 생성한 후 List에 삽입

4. 데이터 파싱 : List Map 에 담긴 데이터를 for 문을 돌면서 List 데이터를 개별로 출력


List Map 객체 선언
ArrayList <HashMap<String,String>> list = new ArrayList<HashMap<String,String>>();

}//ArrayList 넣어줄 계획이고 넣는 타입들은 HashMap이면서 //Hashmap은 key는 String 값 , value 값도 String 값입니다.

List Map 데이터 삽입
HashMap<String, String> map = new HashMap<String,String>();
map.put("1", "아이유");
map.put("2", "수지");
map.put("3", "제니");
//key, value로 String의 값들을 넣어줍니다.
list.add(map);

map = new HashMap<String,String>();
for(int i = 0; i < 5; i++){    
map.put(i + "Hello", "Hello "+ i);    
//for문을 돌면서 순차적으로 넣어줍니다.
}
list.add(map);

map = new LinkedHashMap<String,String>();
for(int i = 0; i < 5; i++){    
map.put(i + "Hello", "Hello "+ i);    
//for문을 돌면서 순차적으로 넣어줍니다.
}
list.add(map);
List Map 데이터 출력
public static void print(ArrayList<HashMap<String, String>> list){    
//main 부분에서 선언한 list 값을 받아서 출력해보도록 합니다.    
for(int i = 0; i < list.size(); i++){        
//arraylist 사이즈 만큼 for문을 실행합니다.        
System.out.println("list 순서 " + i + "번쨰");         
for( Entry<String, String> elem : list.get(i).entrySet() ){             
// list 각각 hashmap받아서 출력합니다.            
System.out.println( String.format("키 : %s, 값 : %s", elem.getKey(), elem.getValue()) );        
}    }}

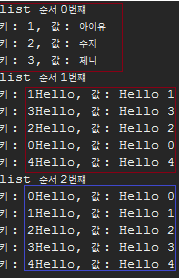
출력 결과

List Map 데이터 치환
List<Map<String, Object>> listMap = new ArrayList<Map<String, Object>>();
		
		Map<String, Object> map1 = new HashMap<String, Object>();
		map1.put("name", "Bob");
		map1.put("age", "23");
		listMap.add(map1);
		
		Map<String, Object> map2 = new HashMap<String, Object>();
		map2.put("name", "Shuan");
		map2.put("age", "31");
		listMap.add(map2);
		
		System.out.println("before: "+listMap);
		// [{name=Bob, age=23}, {name=Shuan, age=31}]
		
		for(Map<String, Object> row : listMap) {

			String name = (String)row.get("name");
			
			if(!name.equals("")) {
				row.put("name", "세종");
			}
		}
		
		System.out.println("after: "+listMap);
		// [{name=Mr.Bob, age=23}, {name=Mr.Shuan, age=31}]​

'JAVA' 카테고리의 다른 글

spring boot 프로젝트 전 개념정리  (0) 2022.08.29
[Java] Map, HashMap, LinkedHashMap  (0) 2022.08.04
request.getParameter("")  (0) 2022.06.02
null과 ""를 구분해서 쓰자..  (0) 2022.05.18
로그인 알고리즘  (0) 2022.05.18
  • Map : Key, Value 형태로 데이터를 저장하는 자료구조
  • HashMap : Map 인터페이스를 구현한 Map 컬렉션 (순서보장X)
  • LinkedHashMap :  Map 인터페이스를 구현한 Map 컬렉션 (순서보장O)


Map 선언
                           Map<String, Object> map = new HashMap<String, Object>();


Map value의 자료형이 Object이기 때문에 모든 Object가 다 들어갈 수 있다.


Map<> map = new HashMap<>() 를 사용하는 이유 :

HashMap을 선언 시, Map<String, Object> map = new HashMap<String, Object>(); 과 같은 형식으로 선언한 것을 쉽게 찾아볼 수 있다. 


1. 인터페이스니까

▶ 포폴 개발을 진행할 때, List list = new List();와 같이 선언할 수 없었다.

    그 이유는 List는 Interface라서 바디를 직접 작성할 수 없기 때문이었다.

    Map도 같은 이유이다.


  ① Map은 인터페이스다.

  ② 따라서 Body를 직접 작성할 수 없다.

  ③ HashMap은 Map 인터페이스를 구현했다.


2. 코드의 유연성을 높일 수 있으니까

▶ Map을 구현한 객체는 HashMap, TreeMap 등이 있다.

    Map으로 선언할 경우, HashMap으로 선언할 때보다 가짓수가 많아진다.

    결국 코드의 유연성을 높일 수 있게 되는 것이다.


  ① Map map = new TreeMap<>();

  ② Map map = new HashMap<>();

Map 데이터 삽입
map.put("animal", "cat");           // {animal=cat}
map.put("food", "pizza");           // {animal=cat, food=pizza}


// 이미 "animal" 키값이 있기 때문에 "dog" 로 갱신되지 않음
map.putIfAbsent("animal", "dog");   // {animal=cat, food=pizza}
map.putIfAbsent("animal2", "dog");  // {animal=cat, animal2=dog, food=pizza}

Map<String, String>  cities = new HashMap<>();
cities.put("Tokyo", "Japan");
cities.put("Seoul", "Korea");
cities.put("Beijing", "China");
cities.put("Paris", "France");
cities.put("Washington", "USA");
cities.put("Brazilia", "Brazil");

V put(K key, V value) 로 값을 넣을 수 있다.
put(k, v) 을 했을 때 이미 키값이 존재한다면 데이터를 덮어쓴다.
putIfAbsent 을 이용하면 Map 에 Key 값이 없을 때에만 데이터를 넣을 수 있다.

Map 데이터 출력
map.get("animal");  // "cat"

map.getOrDefault("food", "chicken");     // "pizza"
map.getOrDefault("food2", "chicken");    // "chicken"

// Normal ways
//1)
for (Map.Entry<String, String> entry : cities.entrySet()) {
    System.out.println("Cities: " + entry.getKey() + ", " + entry.getValue());
}

//2)
for (String key : cities.keySet()) {
    System.out.println("Cities: " + key + ", " + cities.get(key));
}

// Java8 forEach, Lambda
// 1)
cities.forEach((k, v) -> System.out.println("Cities: " + k + ", " + v));

// 2)
cities.forEach((k, v) -> {
    System.out.println("Cities: " + k + ", " + v);
});

//출력결과
Cities: Beijing, China
Cities: Tokyo, Japan
Cities: Seoul, Korea
Cities: Brazilia, Brazil
Cities: Paris, France
Cities: Washington, USA

V get(Object key) 로 value 값을 가져올 수 있다.
V getOrDefault(Object key, V defaultValue) 을 사용하면 key 값이 없을 때 null 대신 설정된 값을 리턴한다.

Map 데이터 삭제
map.remove("animal2");

V remove(Object key) 로 데이터를 삭제 할 수 있다.

Map 데이터 확인
map.containsKey("food");    // true
map.containsValue("dog");   // false


boolean containsKey(Object key) 또는 boolean containsValue(Object value) 로 key 나 value 값이 존재하는 지 확인할 수 있다.

Map 크기(길이) 확인
map.size();
Key, Value 묶음 가져오기
// map: {animal=cat, food=pizza}

map.keySet();   // [animal, food]
map.values();   // [cat, pizza]

Set<K> keySet() 은 Key들로 이루어진 Set 자료구조를 리턴한다.
Collection<V> values() 은 Value 들로 이루어진 Collection 을 리턴한다.


Map 순회
// 출력
// animal: cat
// food: pizza
map.forEach((k, v) -> {
    System.out.println(k + ": " + v);
});

// 한 줄이면 중괄호 { } 생략 가능
map.forEach((k, v) -> System.out.println(k + ": " + v));

// 람다식 안쓰고 for 문으로 구현. forEach 도 내부적으로는 이렇게 구현되어있음
for (Map.Entry entry : map.entrySet()) {
    System.out.println(entry.getKey() + ": " + entry.getValue());
}

forEach 를 사용해서 Map 을 순회할 수 있다.
람다식을 이용하면 좀더 간단하게 나타낼 수 있으며 코드가 한줄이라면 중괄호 { } 를 생략할 수 있다.

Map Compute 데이터 치환
map.compute("animal", (k, v) -> {
    System.out.println(k + "'s value is " + v  + " -> lion");      // animal's value is cat -> lion
    return "lion";
});
// map: {animal=lion, food=pizza}

map.computeIfAbsent("fruit", (k) -> {
    System.out.println("New value of " + k + " is apple");      // New value of fruit is apple
    return "apple";
});
// map: {fruit=apple, animal=lion, food=pizza}


map.computeIfPresent("animal", (k, v) -> {
    System.out.println(k + "'s value is " + v +  " -> tiger");      // animal's value is lion -> tiger
    return "tiger";
});
// map: {fruit=apple, animal=tiger, food=pizza}

compute 를 사용해 원하는 로직을 실행하고 데이터를 넣을 수 있다.

만약 Key 가 없으면 새로운 데이터를 넣어주고 Key 값이 있으면 데이터를 갱신해준다.

만약 기존에 없는 데이터로 compute 연산을 하게 될 때 value 값은 null 이 된다.

computeIfAbsent 와 computeIfPresent 는 조건을 걸어서 compute 연산을 실행한다.

computeIfAbsent 는 Key 가 없을 때만 실행되기 때문에 람다식으로도 key 값 하나 밖에 받지 않는다.

computeIfPresent 는 Key 값이 존재할 때만 실행된다.

만약 Key 가 없거나 있어서 조건이 일치하지 않으면 로직이 아예 실행되지 않는다.


LinkedHashMap 순서 유지
Map<String, String> map = new LinkedHashMap<>();

map.put("animal", "cat");
map.put("fruit", "apple");

System.out.println(map);        // {animal=cat, fruit=apple}

map.put("animal", "dog");       
System.out.println(map);        // {animal=dog, fruit=apple}

map.forEach((k, v) -> System.out.print(k + ": " + v + ", "));       // animal: dog, fruit: apple,​

HashMap 은 hashcode 를 사용하기 때문에 순서가 일정하지 않다.
LinkedHashMap 은 내부를 Double-Linked List 로 구성하여 HashMap 의 순서를 유지한다.
HashMap 에서 상속받기 때문에 HashMap 의 모든 메소드를 사용할 수 있다.

데이터는 먼저 들어간 데이터가 무조건 앞에 위치하게 된다.
forEach 문에서도 동일하다.


추가 소스
package exam;

import java.util.Comparator;
import java.util.Iterator;
import java.util.LinkedHashMap;
import java.util.Map;

public class exam3 {

	public static void main(String[] args) {
		
		Map<String, String> map = new LinkedHashMap<String, String>();
		map.put("key01", "value01");
		map.put("key02", "value02");
		map.put("key03", "value03");
		map.put("key04", "value04");
		map.put("key05", "value05");
		
		//entrySet() 메서드는 key와 value의 값 모두 출력
		//keySet() 메서드는 key의 값만 출력
		//Iterator는 자바의 컬렉션 프레임워크에서 컬렉션에 저장되어 있는 요소들을 읽어오는 방법
		
		// 방법 01 : entrySet()
		for (Map.Entry<String, String> entry : map.entrySet()) {
			System.out.println("방법1: [key]:" + entry.getKey() + ", [value]:" + entry.getValue());
		}
		System.out.println("----------------------------------------------------------------------------------");
		// 방법 02 : keySet()
		for (String key : map.keySet()) {
			String value = map.get(key);
		    System.out.println("방법2: [key]:" + key + ", [value]:" + value);
		}  
		System.out.println("----------------------------------------------------------------------------------");
		// 방법 03 : entrySet().iterator()
		Iterator<Map.Entry<String, String>> iteratorE = map.entrySet().iterator();
		while (iteratorE.hasNext()) {
			Map.Entry<String, String> entry = (Map.Entry<String, String>) iteratorE.next();
		   	String key = entry.getKey();
		   	String value = entry.getValue();
		   	System.out.println("방법3: [key]:" + key + ", [value]:" + value);
		}
		System.out.println("----------------------------------------------------------------------------------");
		// 방법 04 : keySet().iterator()
		Iterator<String> iteratorK = map.keySet().iterator();
			while (iteratorK.hasNext()) {
			String key = iteratorK.next();
			String value = map.get(key);
			System.out.println("방법4: [key]:" + key + ", [value]:" + value);
		}
			System.out.println("----------------------------------------------------------------------------------");
			// 방법 05 : Lambda 사용
			map.entrySet().stream().forEach(entry-> {
				System.out.println("방법5: [key]:" + entry.getKey() + ", [value]:"+entry.getValue());
			});
			System.out.println("----------------------------------------------------------------------------------");
			// 방법 06 : Stream 사용
			map.entrySet().stream().forEach(entry-> {
				System.out.println("방법6-1: [key]:" + entry.getKey() + ", [value]:"+entry.getValue());
			});
			System.out.println("----------------------------------------------------------------------------------");	        
			// Stream 사용 - 내림차순
			map.entrySet().stream().sorted(Map.Entry.comparingByKey()).forEach(entry-> {
				System.out.println("방법6-2: [key]:" + entry.getKey() + ", [value]:"+entry.getValue());
			});
			System.out.println("----------------------------------------------------------------------------------");
			// Stream 사용 - 오름차순
			map.entrySet().stream().sorted(Map.Entry.comparingByKey(Comparator.reverseOrder())).forEach(entry-> {
				System.out.println("방법6-3: [key]:" + entry.getKey() + ", [value]:"+entry.getValue());
			});
		

	}

}
'JAVA' 카테고리의 다른 글

spring boot 프로젝트 전 개념정리  (0) 2022.08.29
List<Map>  (0) 2022.08.04
request.getParameter("")  (0) 2022.06.02
null과 ""를 구분해서 쓰자..  (0) 2022.05.18
로그인 알고리즘  (0) 2022.05.18


console.log()
function handleFileSelect(event) {
    var input = this;
    console.log(input.files)
    if (input.files && input.files.length) {
        var reader = new FileReader();
        this.enabled = false
        reader.onload = (function (e) {
        console.log(e)
            $("#preview").html(['<img class="thumb" src="', e.target.result, '" title="', escape(e.name), '"/>'].join(''))
        });
        reader.readAsDataURL(input.files[0]);
    }
}
$('#file').change(handleFileSelect);
$('.file-edit-icon').on('click', '.preview-de', function () {
    $("#preview").empty()
    $("#file").val("");
});
$('.preview-edit').click( function() {
  $("#file").click();
} );
<div class="file-wrapper flie-wrapper-area">
  <div class="float-left">
    <span class="label-plus"><i class="fas fa-plus"></i></span>
    <input type="file" name="file" id="file" class="upload-box upload-plus" accept="image/*">
    <div id="preview"></div>
    <div class="file-edit-icon">
      <a href="#" class="preview-edit">수정</a>
      <a href="#" class="preview-de">삭제</a>
    </div>
  </div>
</div>
.thumb {
    width: 100px;
    height: 100px;
    margin: 0.2em -0.7em 0 0;
}
.remove_img_preview {
    position:relative;
    top:-25px;
    right:5px;
    background:black;
    color:white;
    border-radius:50px;
    font-size:0.9em;
    padding: 0 0.3em 0;
    text-align:center;
    cursor:pointer;
}

http://yoonbumtae.com/?p=3304 


자바스크립트: input file에서 이미지 미리보기 기능 만들기 (한 개, 여러 개) - BGSMM

1) 이미지가 1개인 경우 미리보기 이미지가 표시될 이미지 태그를 생성하고, input file 태그를 생성하고, 자바스크립트의 FileReader()를 통해 이미지가 로딩되면 이미지 태그의 src 속성이 교체되도록

yoonbumtae.com

https://guiyomi.tistory.com/119


Javascript - 업로드한 이미지 미리보기 구현

자바스크립트에서는 input type="file" 태그를 이용하여 이미지를 포함한 다양한 확장자의 파일을 업로드할 수 있다. 만약 이미지만 업로드하게끔 제한하고 싶다면 accept="image/*" 프로퍼티를 추가하

guiyomi.tistory.com

https://designcck.tistory.com/43


[JS] input type file 파일 미리보기 수정 삭제 기능

이번에는 파일 업로드 시 미리보기 가능 수정 삭제 입니다. input type="file"은 별도로 커스텀으로 css로 변경이 가능하며 미리보기 구역의 크기또한 조절이 가능하다.

designcck.tistory.com


       출처: https://bluemint.tistory.com/16 [BLUEMINT:티스토리]

'JSTL' 카테고리의 다른 글

배열로 넘어온 속성값 유무 확인하기  (0) 2022.06.01

2개의 JSP를 하나의 서블릿으로 돌리기 위해 서블릿에 파라미터 값을 요청하고

해당 값이 없을 때는 A를 실행, 값이 있을 때는 B를 실행시키도록 프로그램을 짰다.


난 당연히 넘어오는 값이 없을 때는 petbno에 0이 저장될 줄 알았으나,

int petbno = Integer.parseInt(request.getParameter("petbno"));

결과는 계속 nullpoint 에러가 떴다.


문제는 서블릿에서 넘어올 값이 없으면 아예 getParameter 지점에서 에러를 띄어버린다.


그래서 getParameter를 if문 내로 집어넣으니 정상적으로 작동됐다..


int bno = Integer.parseInt(request.getParameter("bno"));
		String status = request.getParameter("status");
		
		String entercheck = request.getParameter("entercheck");
		
		String nowStatus = null;
		
		if(entercheck.equals("1")) {
			
		EnterDAO dao = new EnterDAO();
		nowStatus = dao.statusChange(bno, status);
		
		}else {
			int petbno = Integer.parseInt(request.getParameter("petbno")); //요녀석!
			AdoptDAO dao = new AdoptDAO();
			nowStatus = dao.statusChange(bno, status, petbno);
			
		}
		response.setContentType("application/x-json; charset=utf-8");
		
		PrintWriter out = response.getWriter();
		out.print(nowStatus);

'JAVA' 카테고리의 다른 글

spring boot 프로젝트 전 개념정리  (0) 2022.08.29
List<Map>  (0) 2022.08.04
[Java] Map, HashMap, LinkedHashMap  (0) 2022.08.04
null과 ""를 구분해서 쓰자..  (0) 2022.05.18
로그인 알고리즘  (0) 2022.05.18


@media(max-width:768px) {

.aaa {
 	 width: 100%; height: 155px;
 } 
 
 #hello {margin-top:89px;}
 
}

위와 같이

@midia(max-width:768px){


미디어로 감싸서 style 속성을 주면 된다!

'CSS' 카테고리의 다른 글

display:block 과 width, height  (0) 2022.06.01

+ Recent posts